IGToolsPP Documentation
Table of contents
- Introduction
- SpeedTree Export
- Unreal Import
- Wind animation control
- Materials
- Support for grass
- Changelog
Video: Short tutorial, Youtube playlist with various tutorial and examples
Introduction
SpeedTree to Pivot Painter 2.0 plugin (IGToolsPP) allows to import a tree generated in SpeedTree (exported as USD – universal scene description) in Unreal Engine in order to create the following
- A static mesh (nanite or not) with the additional UV channel and textures needed for Pivot Painter 2 wind animation
- A material layer implementing the wind animation
- A set of materials for the mesh, either with normal textures or UDIM textures (less material slots in the mesh)
Current limitations: at the moment only trees with one trunk are supported (not grass etc.). Also, the plugin doesn’t import the textures (like base color), you will need to import them yourself. This is mostly because we normally use original PBR textures (like Quixel) instead of those exported by SpeedTree.
How to install (project plugin version from artstation)
- Download the plugin for your Unreal Engine version (UE5.3+)
- Unzip into: <ProjectDirectory >/Plugins (create Plugins directory if it doesn’t exist). After that you should have <ProjectDirectory >/Plugins/IGToolsPP/ directory.
- If you are using C++: Right Mouse Button on your .uproject file ->Generate Visual Studio project files
- Launch project
- If it’s not enabled: Go to Edit ->Plugins ->”Project” category ->Importers ->Enable “IGToolsPP” and restart the editor
- Done
SpeedTree Export
TLDR: Each generator must have an unique name without spaces or underscores. Export as USD with the parameters specified below.
When you make your tree in SpeedTree, you work with generators. If you have a look to the generation window, you recognize a tree of generators establishing a hierarchy. This information is very important to generate the wind animation in Unreal Engine. In the example in the screenshot there are 7 levels starting from the trunk. In Unreal Engine we will need to extract from this information the 4 levels necessary for the wind animation. The generator’s structure is not exported by SpeedTree, so we need to have unique generator names without spaces or underscores to reconstruct it in Unreal.
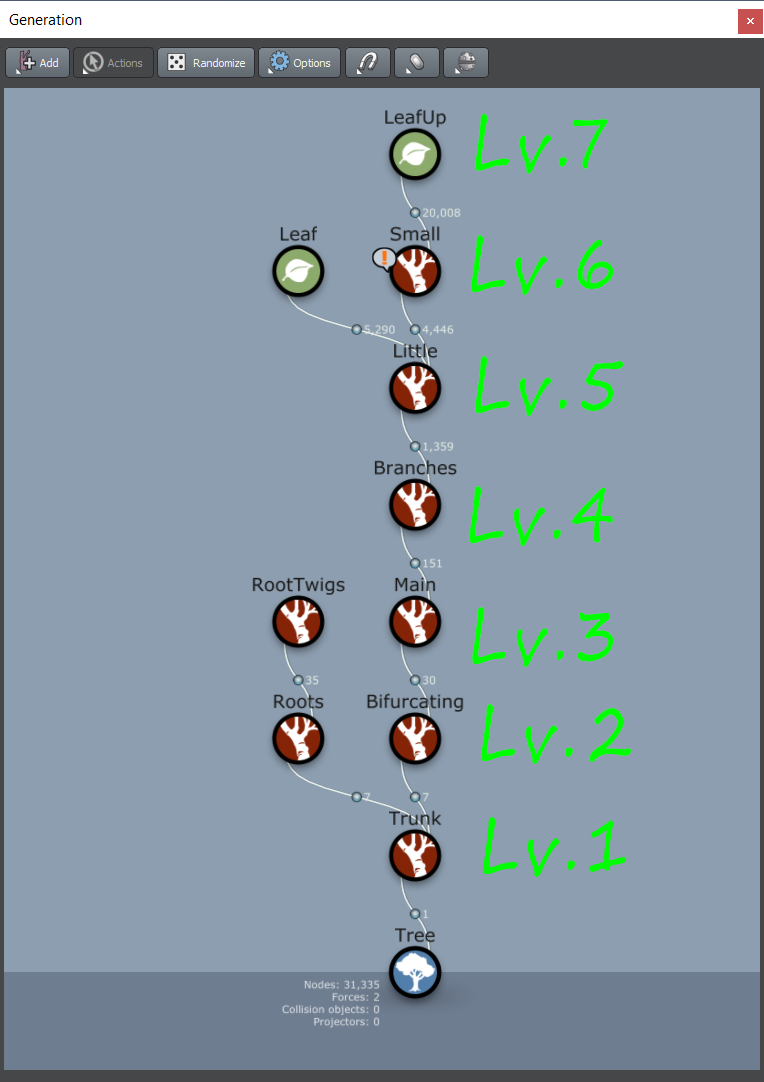
You need to export in USD format, this option is found in the VFX tab. As said before the hierarchy information is crucial to generate the textures and the UV channel needed by pivot painter 2 in Unreal Engine, so make sure to export by hierarchy. The tree in the example above has 7 levels of hierarchy, so in the hierarchy level field it’s enough to put 7. In simple cases (one trunk tree) you can also put the maximal number of levels allowed (which is 9), but in other cases (like grass) the exact number is required or it will not export correctly.
You also need to export the branch spines. This information is used by the plugin to calculate the x-direction vector and x-extent needed for the wind animation.
As Unreal Engine units are cm make sure to convert your tree into this unit when exporting (see screenshot for all details).
Don’t skip texture save because otherwise Unreal will not be able to reconstruct the materials.
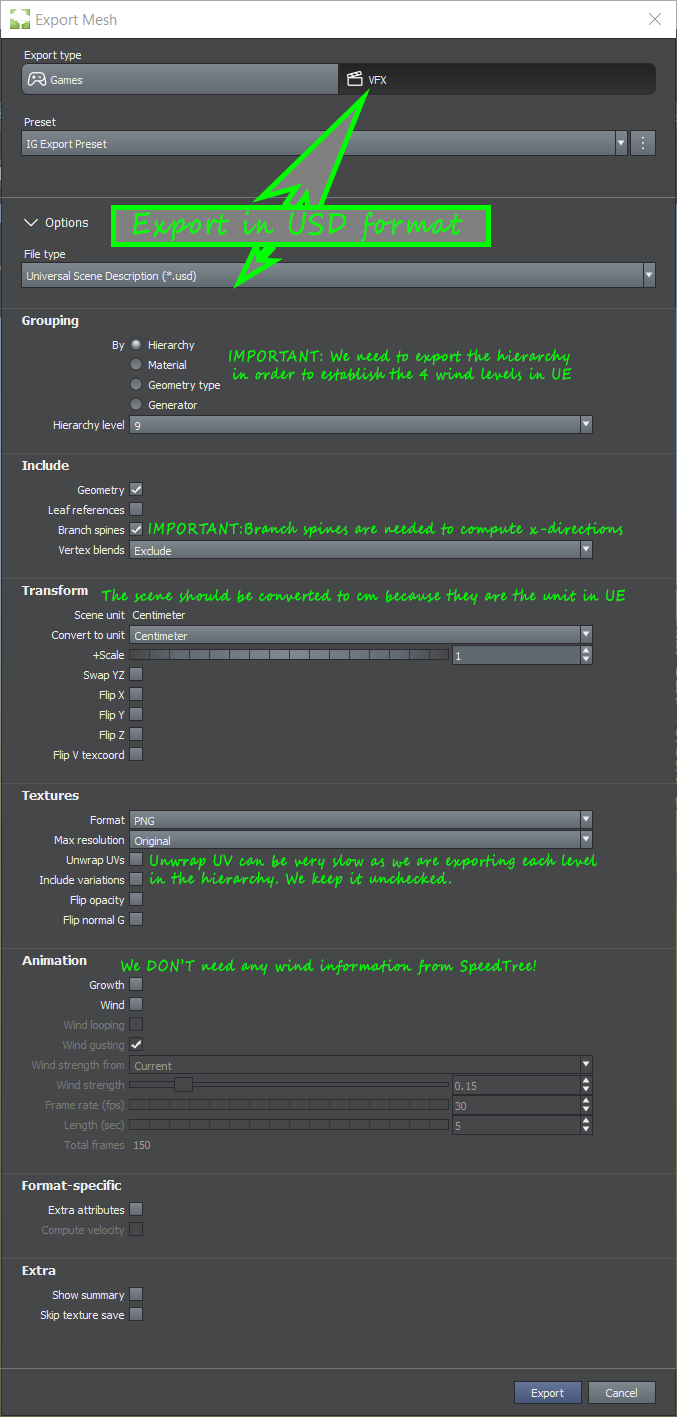
Keep in mind that the export phase can be slow. The more complex is your hierarchy, the bigger the number of meshes, the slower SpeedTree export is. Notice you don’t need to export any wind information from SpeedTree, the wind animation will be entirerely made in Unreal Engine.
Unreal Import
The plugin UI can be opened from “File > Import SpeedTree USD…” menu. Another way to access it is go to the plugin folder in the Content Browser (located in /Plugins/IGToolsPP Content), locate UI/UI_IGToolsPP, right click on it and choose “Run Editor Utility Widget”.
Before you start, we recommend to create a new basic level because the USD importer will add the imported mesh into it.
First, we need to import the USD file. Click the Import USD button, it will launch the Unreal’s built-in USD importer. You can skip the default cache creation by chosing “Don’t use a default cache”. For big meshes the import can be pretty slow. Once the import finishes we will see the USD mesh added to the level and in the UI we will see the tree of its generators.
Choose the Base name for the assets you will be generating as well as the folder where they will go. The base name will be used by all generated assets, so, for example, if your base name is “Tree” the generated assets will be called “SM_Tree”, “MI_Tree” and so on.
In the Levels Mapping panel you need to select which parts of the tree will have their own pivot. The levels that are not selected will be merged with their parents. The PP2 material only supports 4 levels, so if the tree has more then that you need to merge some levels together.
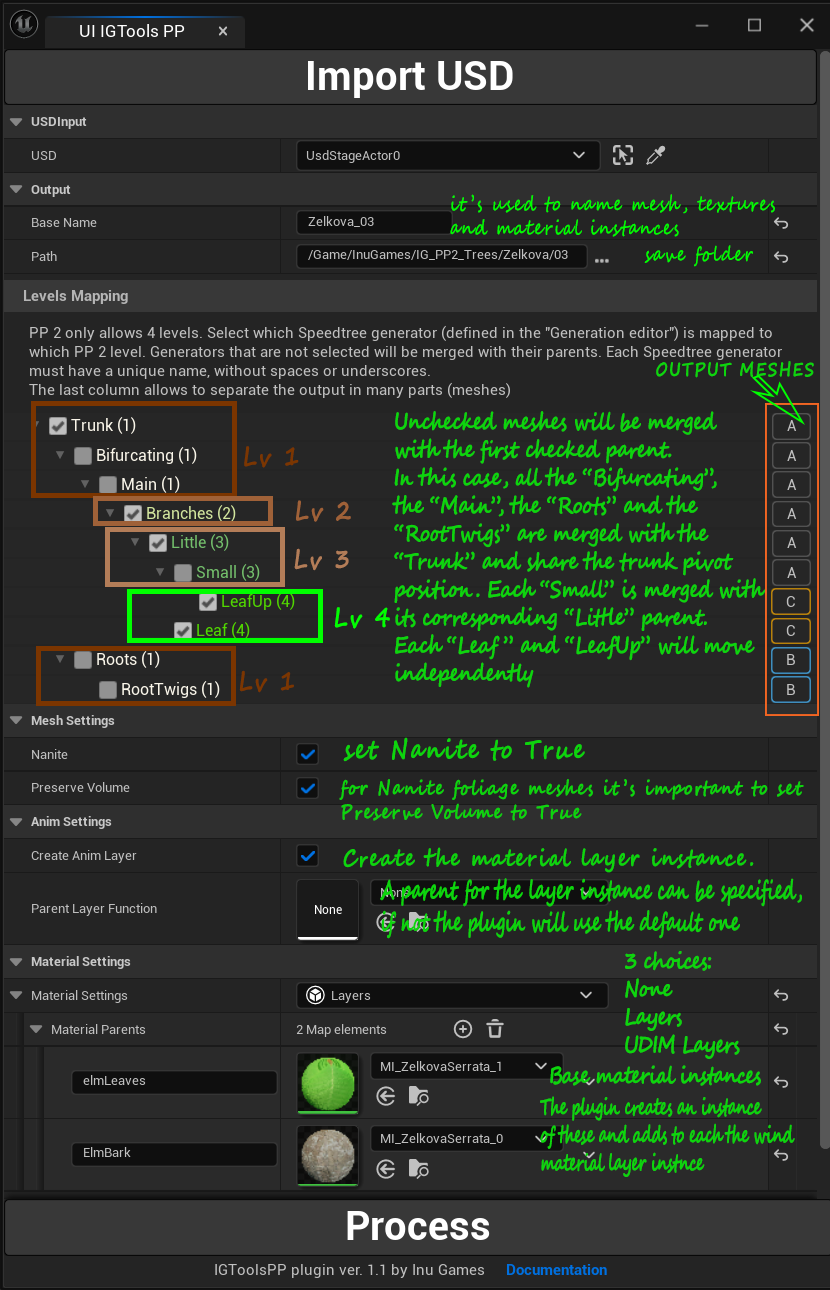
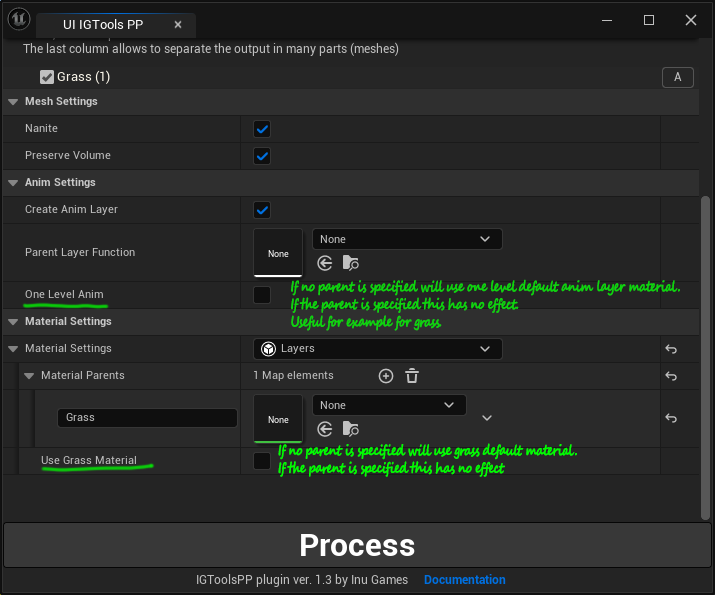
Mesh settings panel allows to choose if the generated mesh will be nanite or not, this option can later be changed in the mesh. Preserve volume option is recommended for the trees in order to avoid the loss of volume at the distance.
Create Anim Layer option will create an instance of the wind animation material configured with the generated textures. Parent Layer Function can be left empty to use the default material layer supplied with the plugin.
Finally, Material Settings panel allows you to configure the material that will be generated for the mesh. Currently, there are 2 type of materials: Layers and UDIM. Layers will create the same number of material instances as specified in the USD and assign them to the corresponding slots of the generated mesh. UDIM will create just one material instance using UDIM textures. Those tho methods are explained below. In case you leave Material Parents empty the dafault base material provided with the plugin will be used.
Once the configuration is done click the Process button and the plugin will generate the assets.

Generated assets. 1: Mesh, 2 and 3: PP2 textures, 4: Anim layer instance, 5 and 6: tree materials
Import example
Let’s look at this example more closely. We have generated our tree mesh SM_Zelkova_03, pivot painter textures T_Zelkova_03_PivPos_Index and T_Zelkova_03_xDir_xExt, as well as the anim layer MI_ML_Zelkova_03_Anim and the 2 tree materials MI_Zelkova_03_0 (bark) and MI_Zelkova_03_1 (leaves).
MI_ML_Zelkova_03_Anim material layer instance defines the anim parameters for this particular tree, which depend on the number, size and positions of the branches and leaves. It references the two PP2 textures. If you have many different variants of the Zelkova tree you will have one such material per variant.
MI_Zelkova_03_0 and _1 are the material instances applied to the tree. They reference MI_ML_Zelkova_03_Anim as a layer then inherit the common parameters (like textures) from their parent materials. So for all the Zelkova trees we have there’s 2 common base materials defining the appearence.
Wind animation control
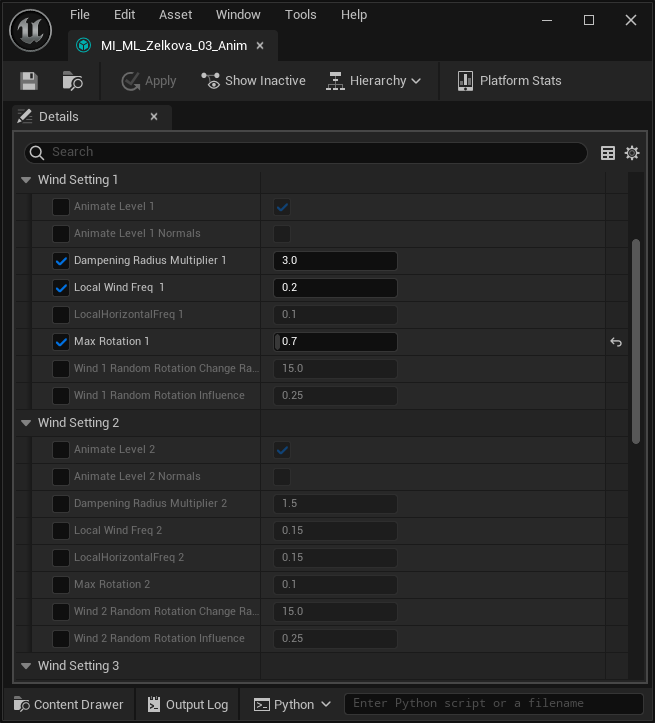
This section explains various parameters that control the wind animation. Most of them are located in the generated Anim material layer (child of ML_IG_PivotPainter2Anim) which you can fine tune to change your tree wind animation. The parameters here are split in 4 groups, one group per level. It depends how you mapped the levels, but usually Wind Settings 1 are for the trunk, 2 and 3 are for the branches and 4 for the leaves. Global direction and speed of the wind are defined in the MPC_Wind material parameter collection, located in the Materials folder of the plugin.
Anim material layer parameters
- Animate Level N
- Enables or disables the animation of this level.
- Animate Level N Normals
- Adjusts the normals to match the anim. Pretty costly and usually not required
- Dampening Radius Multiplier
- Defines the shape of the bending. If the value is <1 it will only bend the beginning of the branch, useful for leaves. If the value is 1 the whole branch will bend, and for values >1 the branch will bend less, you can imagine that the whole branch is longer and we only are seeing the first part of it. Useful for the trunk
- Local Wind Freq and LocalHorizontalFreq
- Two frequency parameters defining how fast the branch is oscilating. Internally they control the sampling from the wind turbulence texture, one is for the U coordinate and another for the V. Multiplied by the wind speed from MPC_Wind (see below)
- Max rotation
- How much the tip of the branch can rotate. Multiplied by the wind speed from MPC_Wind (see below)
- Random rotation change
- Add a random variation to the wind direction, bigger number means less variation (1 = more variation, 20 = less variation)
- Random rotation influence
- Multiplier for Random rotation change
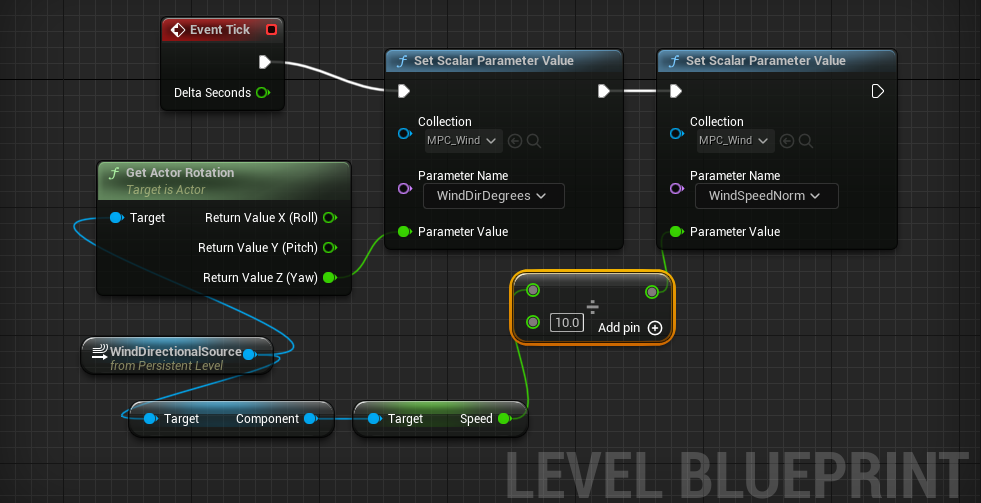
MPC_Wind parameters. You can control those dynamically, for example using wind actor rotation yaw and wind speed.
- WindDirDegrees
- World space wind direction in degrees. You can use directional wind actor rotation yaw to contol this.
- Wind Speed Norm
- Speed of the wind, normalized between 0 and 1. This value will multiply the Wind frequency and max rotation parameters. To control this you can use directional wind actor speed divided by about 10 or so.
Wind Actor Version 1.4 introduces a Wind actor. It’s located in IGToolsPP/Blueprints folder. You can drag and drop this actor in the level and control wind speed and direction. Wind speed is controlled via “Wind Speed” property (1-10, like Directional Wind Actor, the value will be divided by 10). And the direction is controlled by rotating the actor. You can also attach a standard Directional Wind Actor to it and in this case it will control the speed of the attached actor too. It’s useful if you want to add some simulated cloth in the level for example.
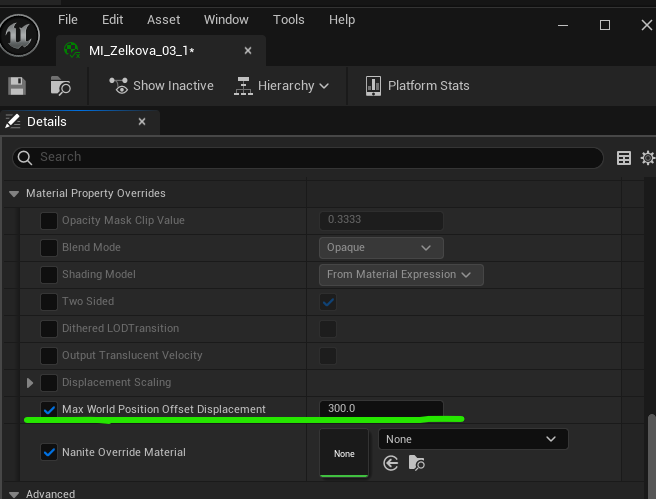
Finally, there’s a very important parameter called “Max World Position Offset Displacement”. It’s located in the material instance applied to the mesh (Material Property Overrides section). This parameter clamps how far the WPO can move. For nanite meshes, if you keep it at zero there will be artifacts like parts of the mesh disappearing. Big values, like let’s say 2000cm looks good but also cost a lot in performance if you are near the tree. Finally values like 100-200 are pretty fast but you have to ensure your tree doesn’t move too much, otherwise you will see the “clamping” (artifacts like a part of the tree is hitting an invisible wall). The default is 300cm.
Materials
The plugin includes the possibility to generate the material instances for your tree. You can choose between 2 models: assign a simple layered material instance to each material slot of the model or merge all material IDs in one material and use UDIM textures. If you want to use one of these options, please read the section about material textures and properties.
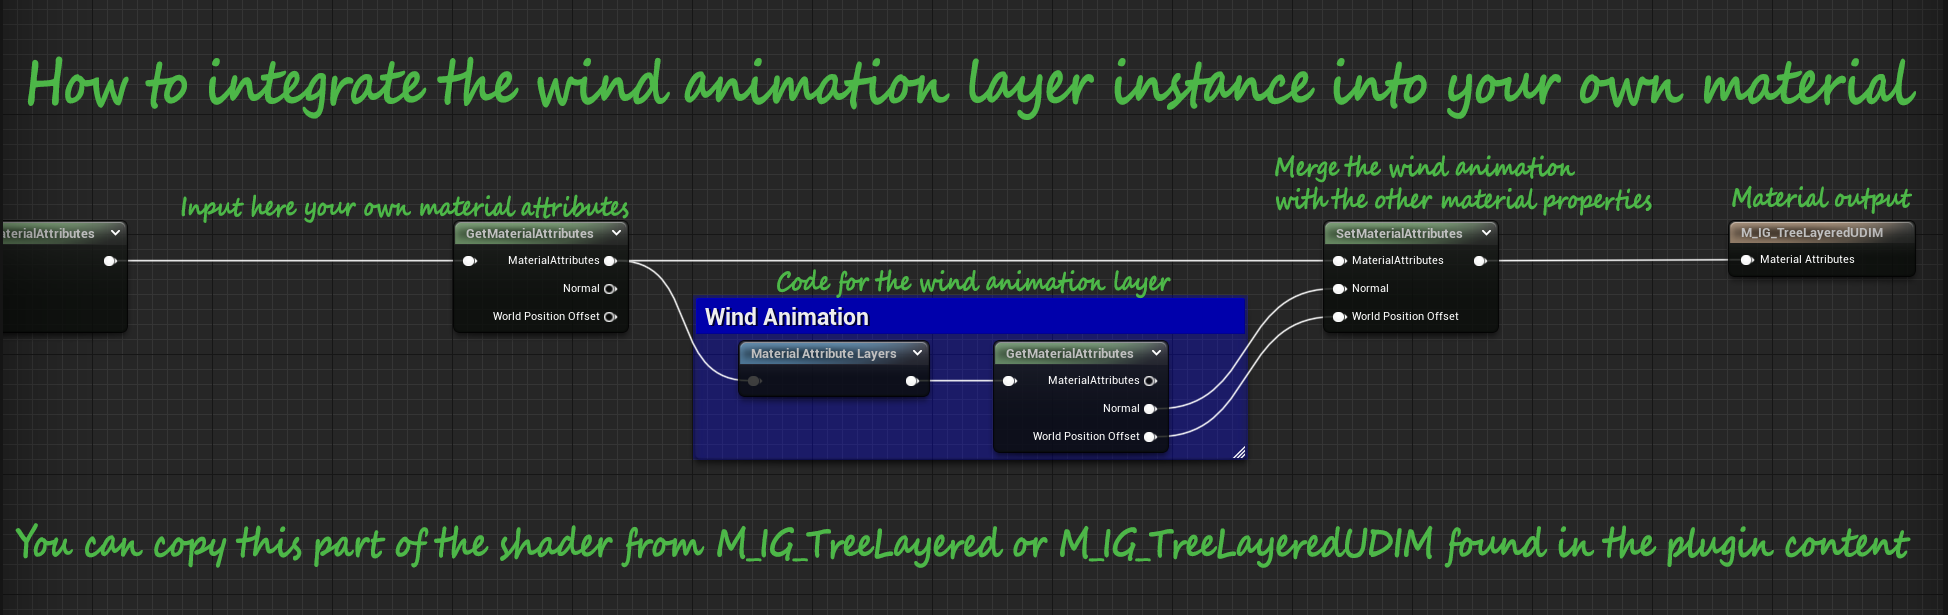
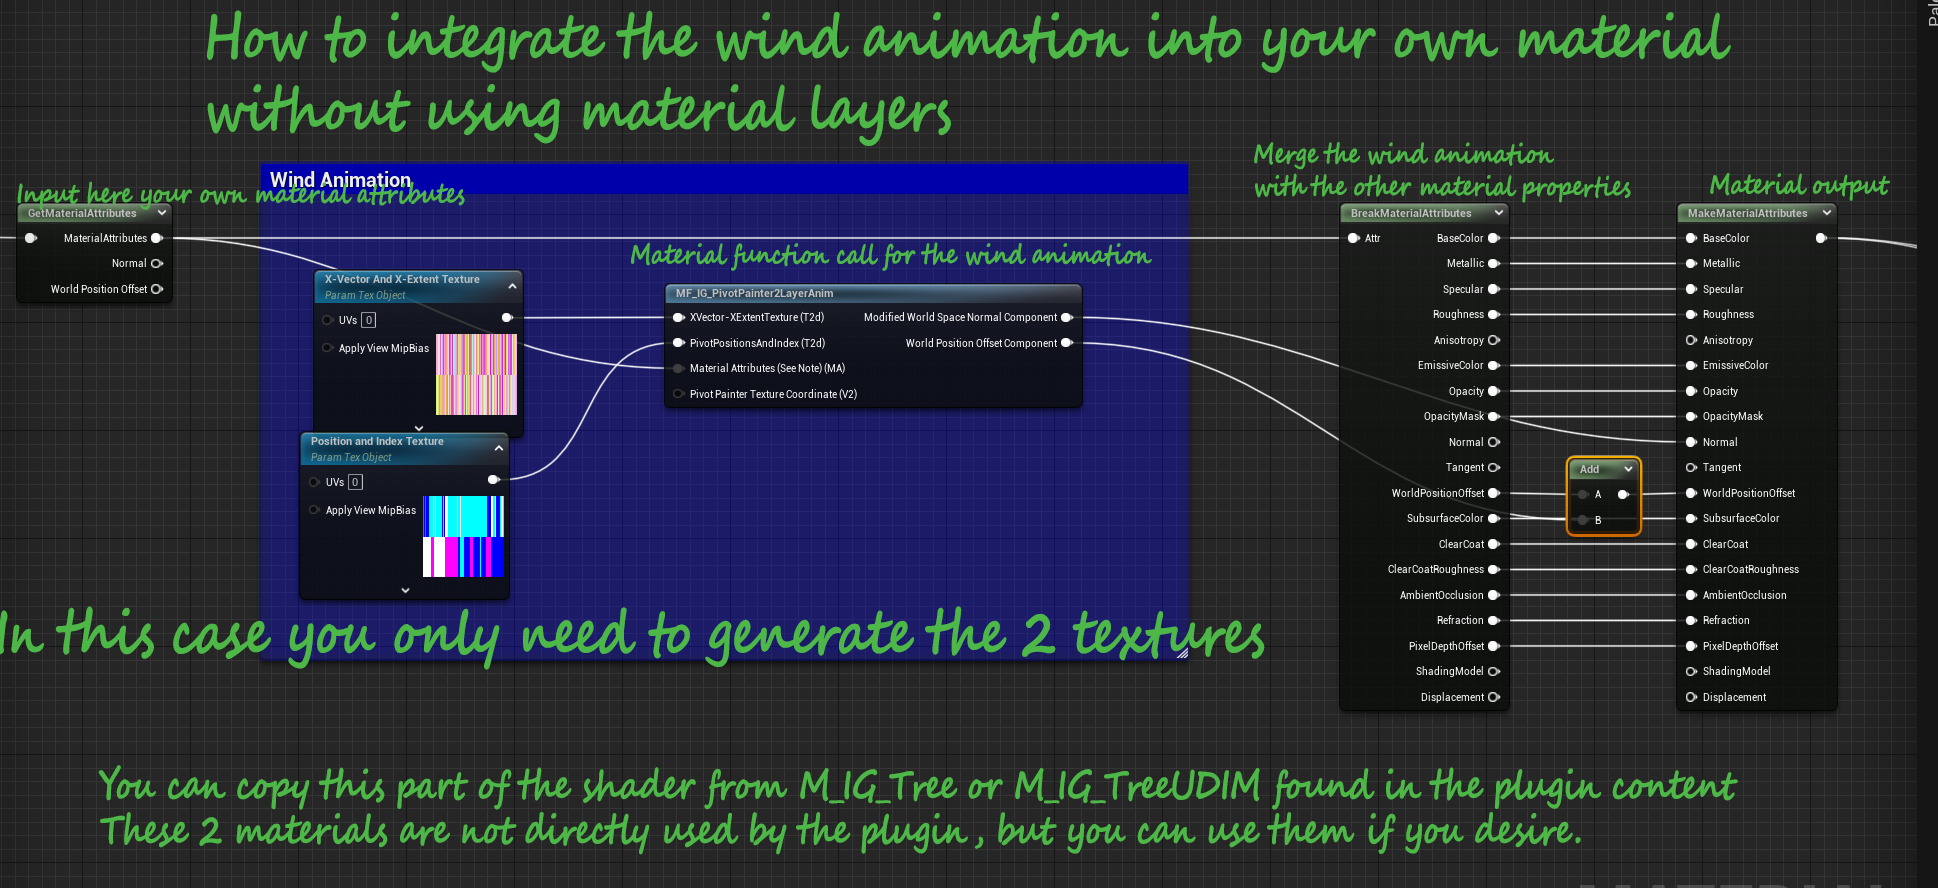
Of course, you can also make your own material. In this case, you need to follow the instructions reported here below in the screenshots
Make your own material using the material layer function provided by the plugin
Make your own material using a classical material approach
Textures and properties
In order to use the materials provided with the plugin, you need to pack your textures in the following way:
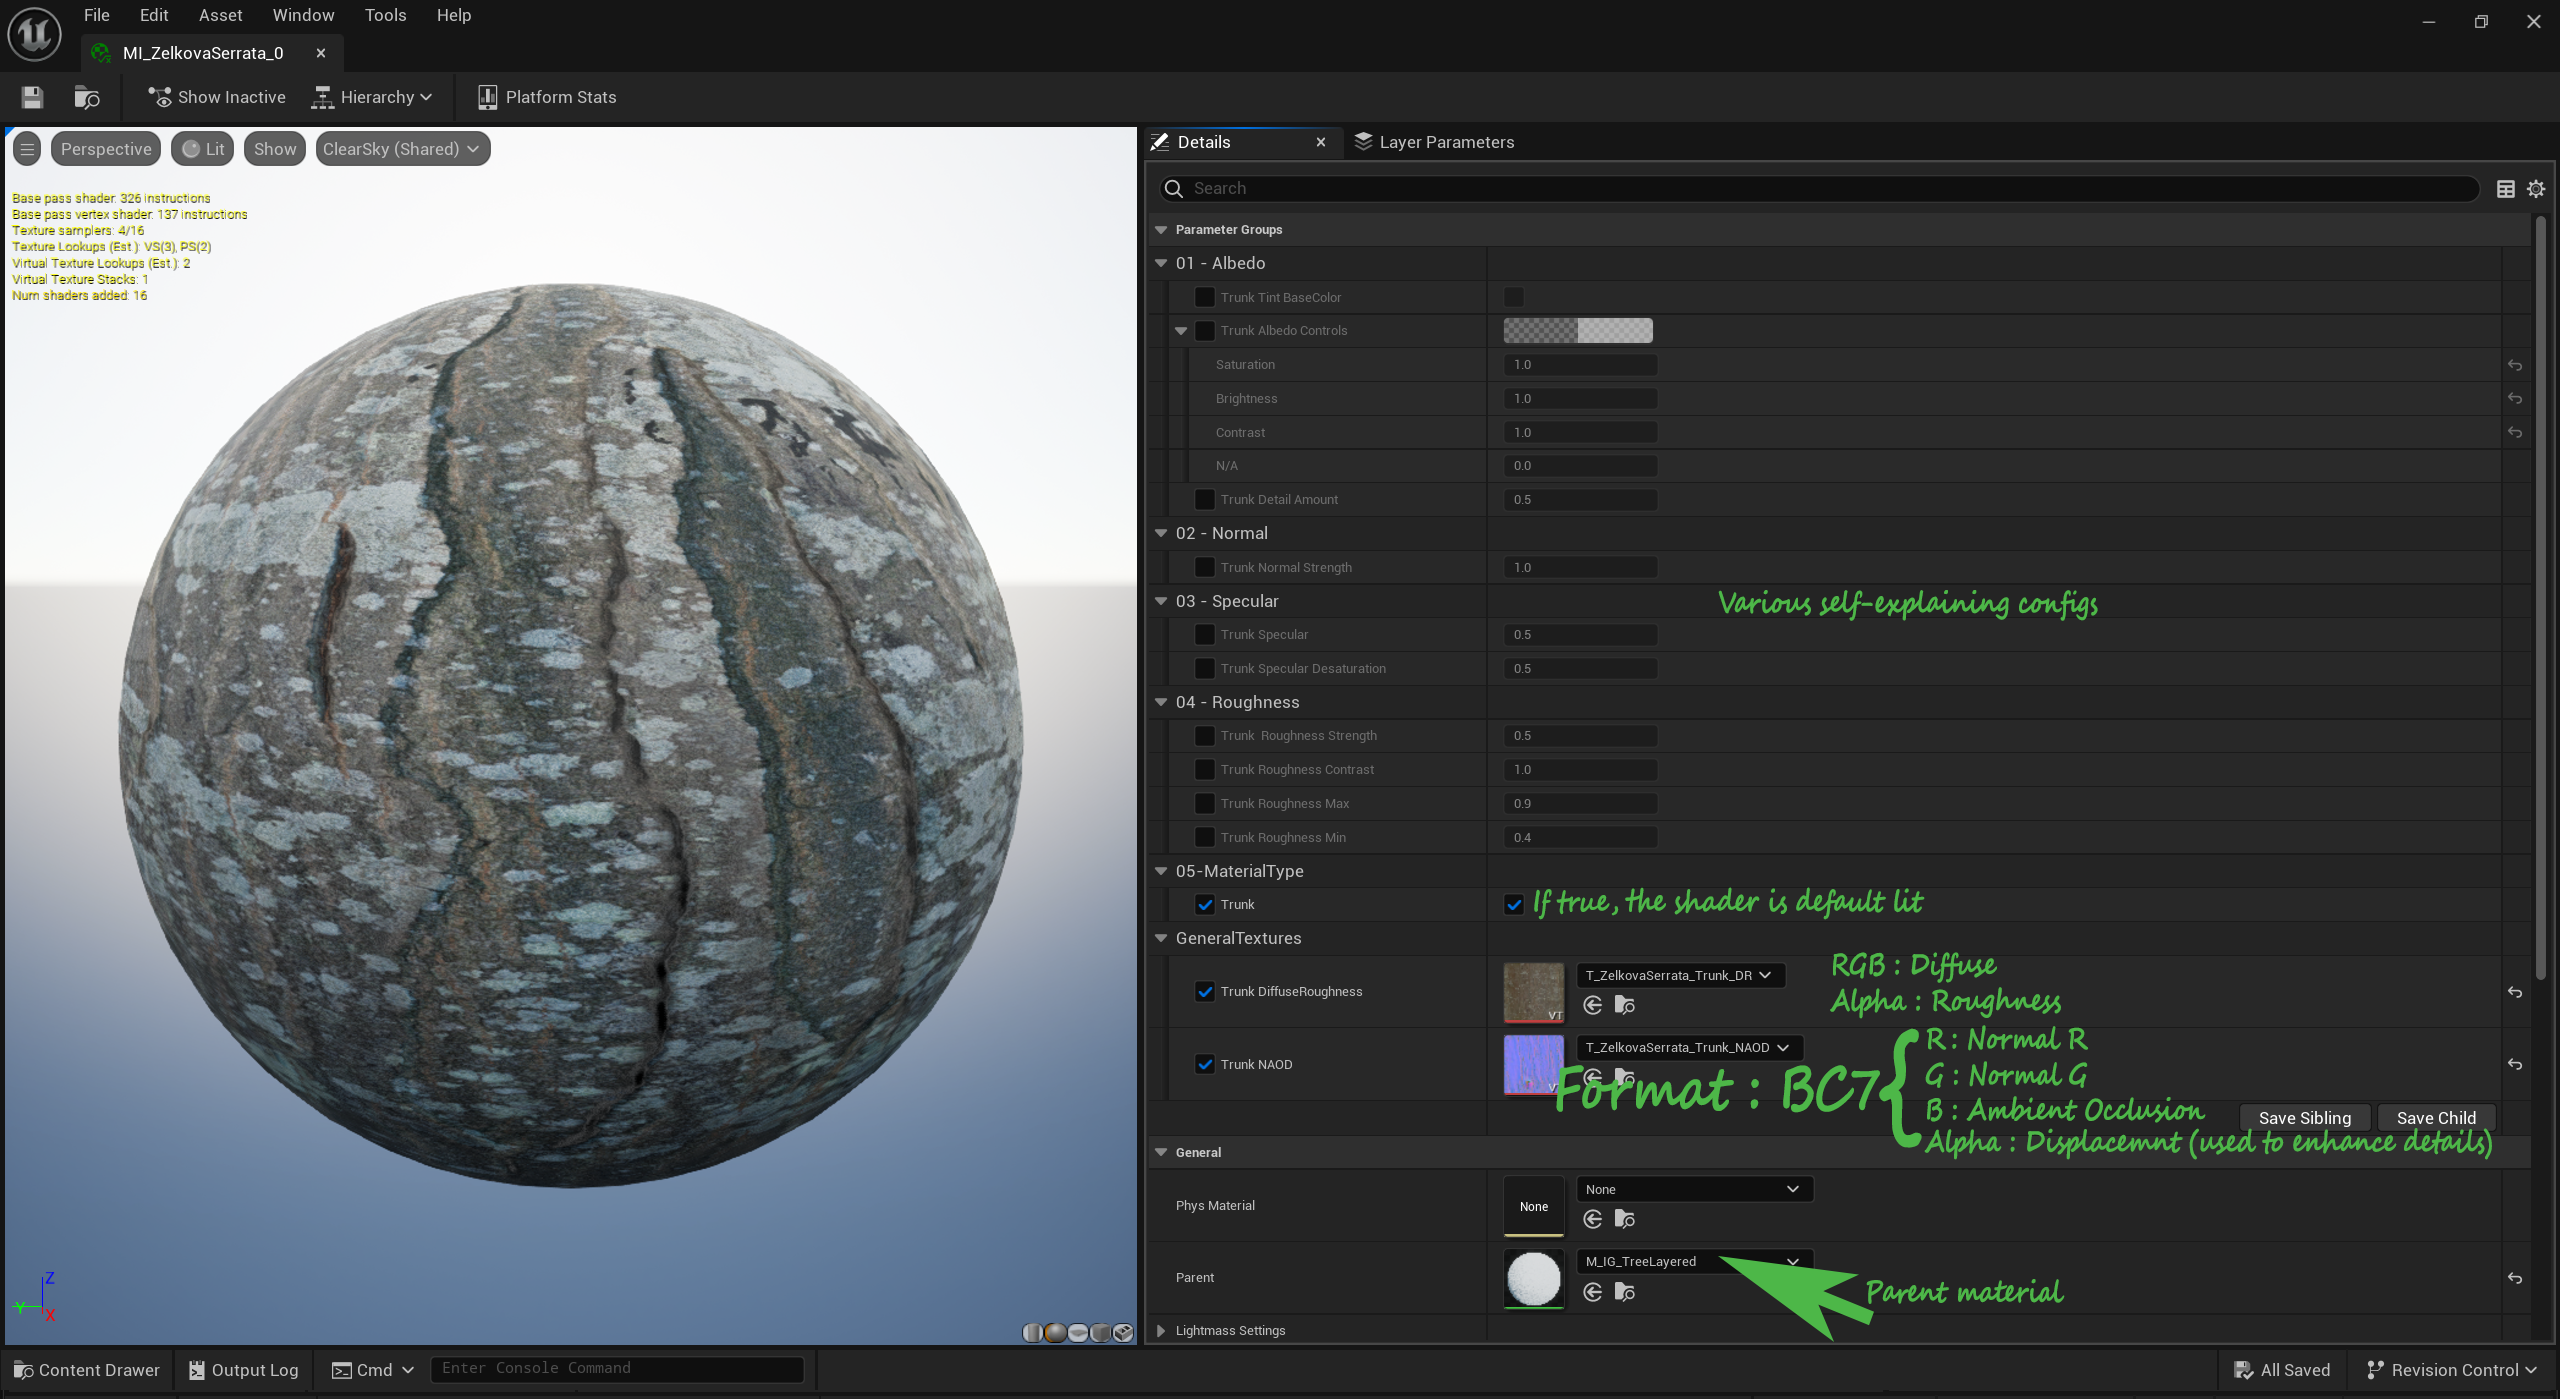
- Default lit case :
- Diffuse+Roughness : Diffuse in RGB, Roughness in Alpha
- Normal+AO+Displacement : Normal R in R, Normal G in G, Ambient Occlusion in B, Displacement in Alpha.
The format should be BC7, sRGB= False. Displacement is used to enhance albedo details, AO is used to calculate the specular
- Two sided foliage case :
- Diffuse+Roughness : Diffuse in RGB, Roughness in Alpha
- Normal+AO+Subsurface Mask : Normal R in R, Normal G in G, Ambient Occlusion in B, Subsurface Mask in Alpha.
The format should be BC7, sRGB= False. AO is used to calculate the specular, Subsurface Mask for the subsurface - Opacity (optional) : if you want your leaves to be transparent, you need to provide also a texture for the opacity, the format should be Mask and the texture should be a normal texture, not a virtual texture. The material instance blend mode should be manually changed from Opaque to Masked for this to work.
Default lit setup
Two sided foliage setup

UDIM setup
The plugin has also the option to manipulate the model UVs and merge all the material IDs in one material using UDIM textures.
Our UDIM material supposes that V can be unrestricted while UVs can be shifted in the U direction how much needed. Notice that not in all cases is possible to use this UDIM setup. In the following screenshots you find a couple of practical examples.
U restricted to 0-1, V unrestricted
In SpeedTree you have some control on the UVs produced by each generator. In this example, we have chosen to have the bark UVs with U restricted in the 0-1 range and V unrestricted. In order to be able to use an UDIM texture, we need to move the leaves UVs (material ID = 1) from their current U position to U position + 1.0. The V position is left untouched.

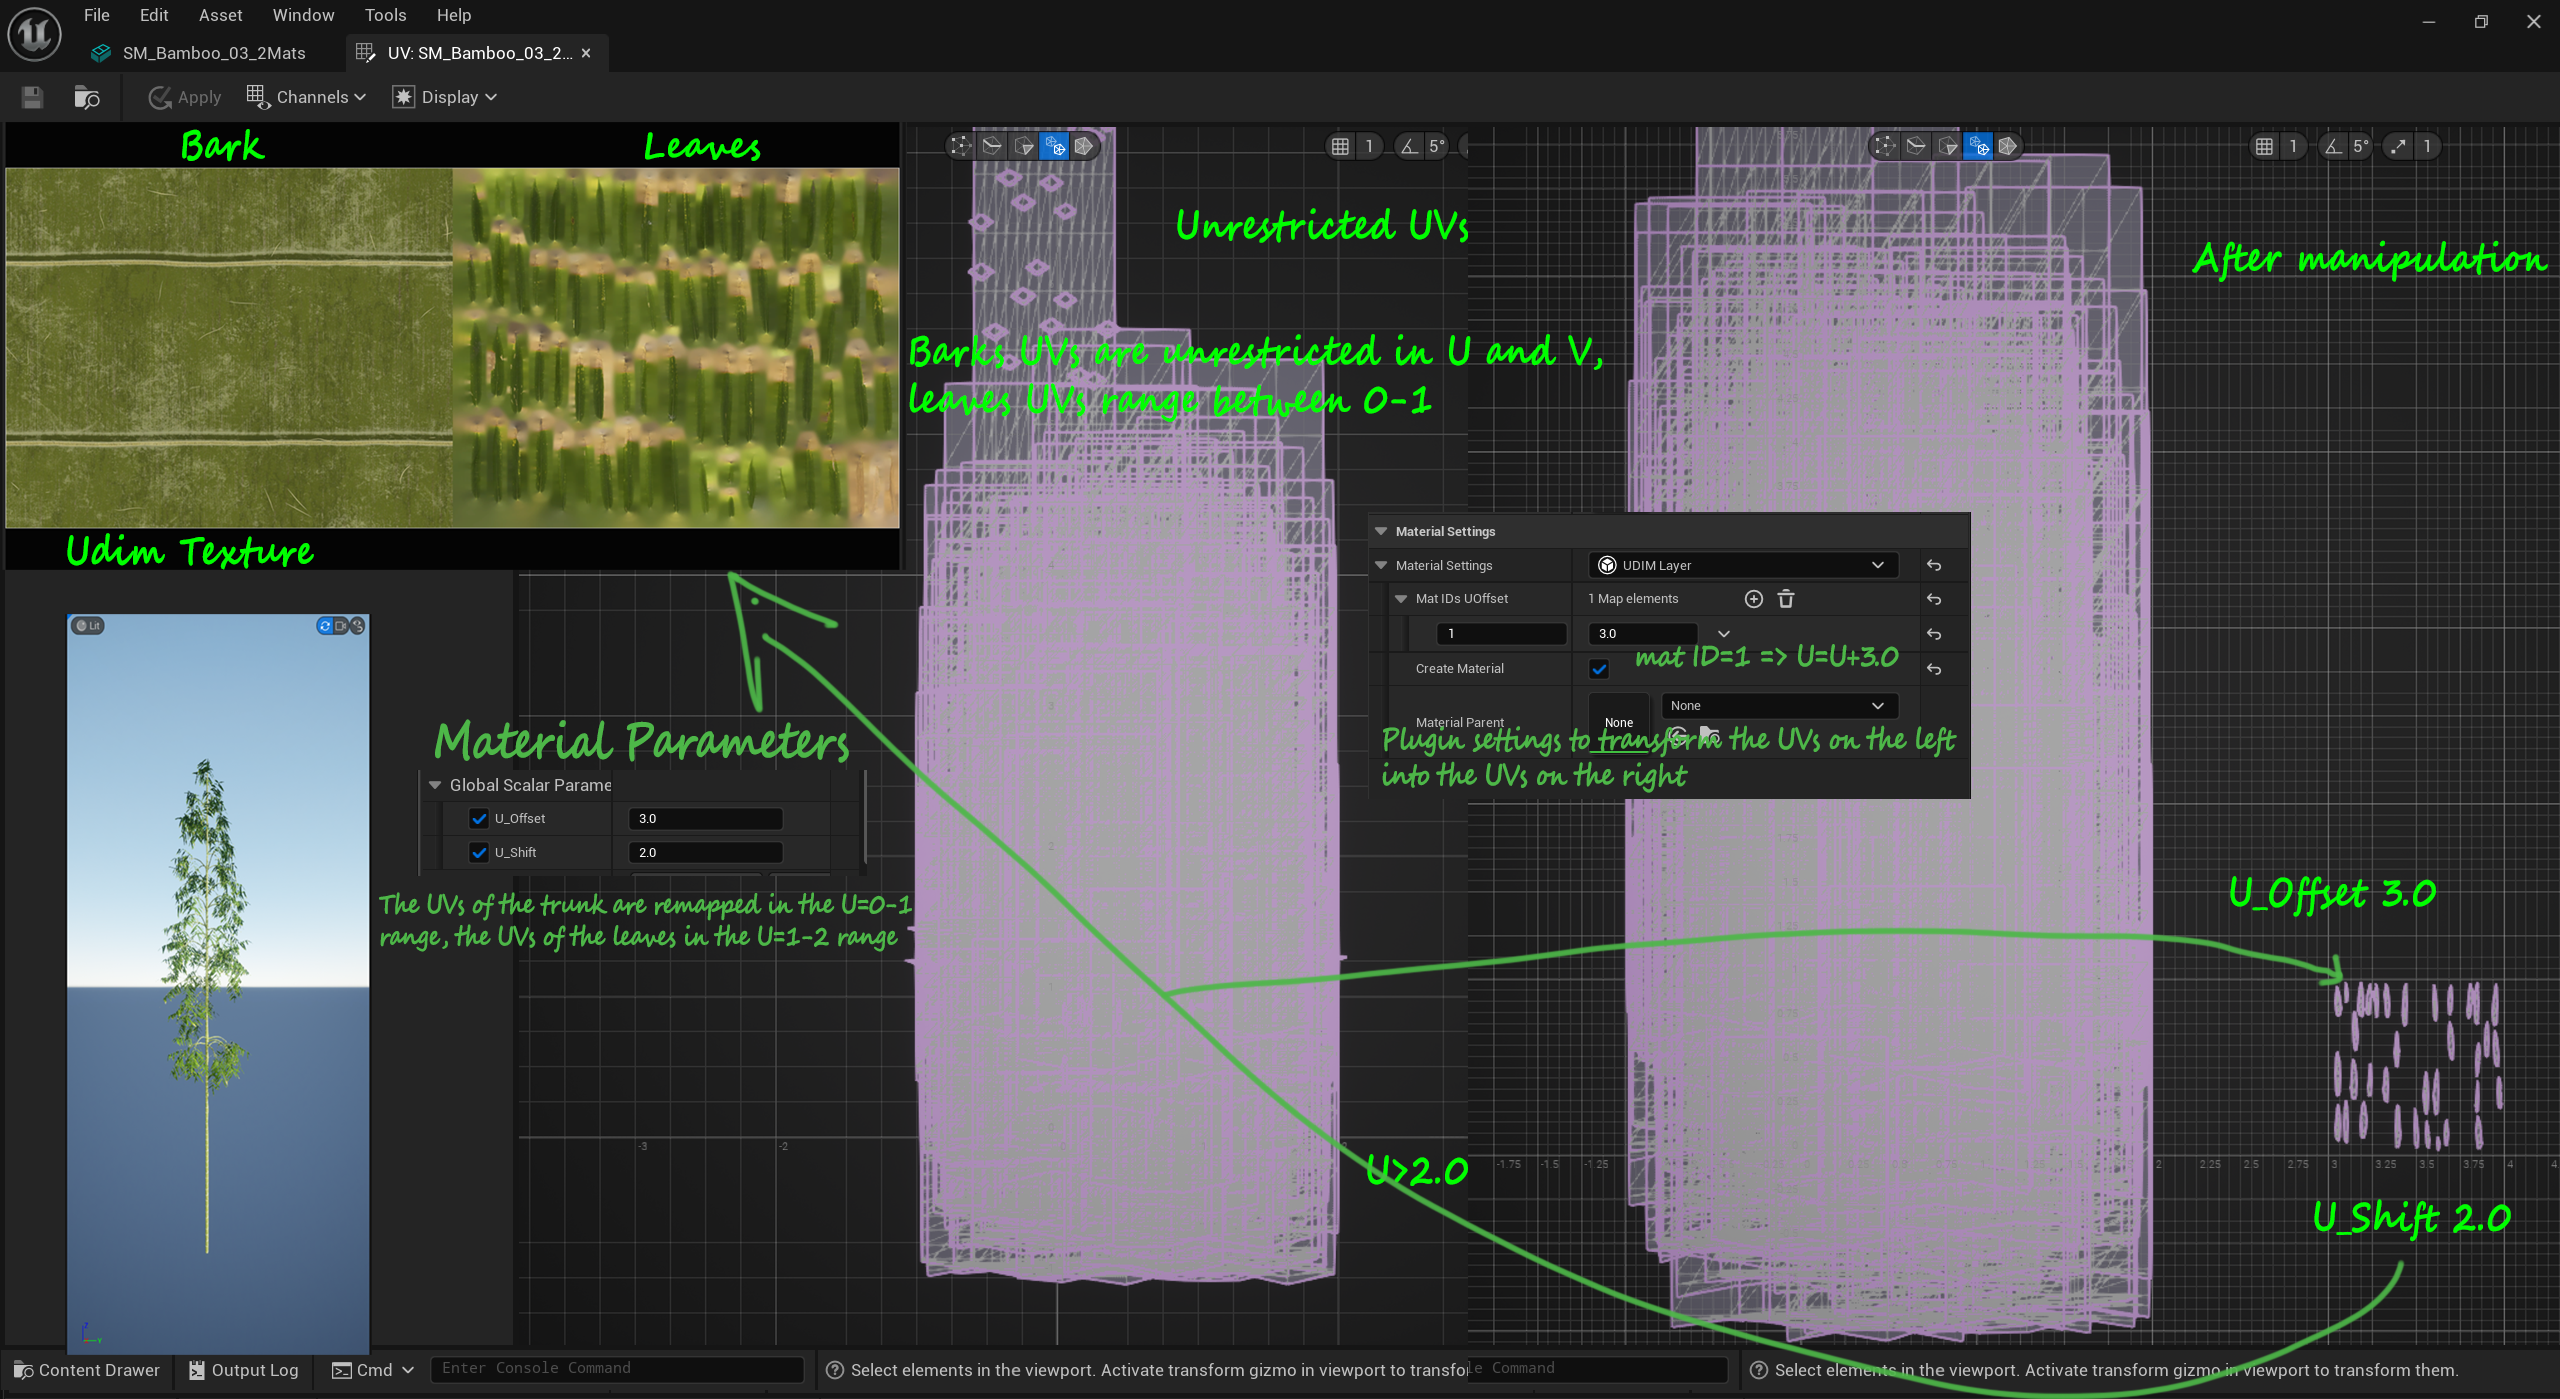
UVs unrestricted
In this example we have chosen to leave the UVs of the bark unrestricted. The UVs of the bark are no more confined in the 0-1 U range. So, in order to use UDIM textures we need to move the UVs of the leaves (material ID=1) from their U position to U+3.0. The parameters U_Offset=3.0 and U_Shift=2.0 in the material allow to remap the UVs of both bark and leaves to read correctly the UDIM texture.
Current limitations of the UDIM setup
As already said, not in all cases it’s possible to use this UDIM version of the material. For example, if for some reason, you need to twist the UVs of one generator, the UVs produced by SpeedTree won’t be straight in the V direction, making impossible to use the UVs manipulations implemented with the plugin.
Support for grass
IGToolsPP v1.3 has support for grass. It’s important to export from SpeedTree with the correct number of levels, otherwise the grass will look funny. We also added a new type of anim layer function with just 1 animated level and a new base material specific to the grass.
Changelog
v1.6.3 (14.3.24)
- fix: correctly process the usd located in the project folder
- fix: leaves with multiple materials now work correctly
v1.6.2
- fix: correctly opens the usd located in the project folder
v1.6.1
- bug fix
v1.6
- Added base materials without virtual textures
- Base material directory can now be modified via project settings. This allows to move materials/textures to the game content folder and remove the plugin from the packaged build. (Project Settings -> Plugins -> IGToolsPP)
v1.5 (27.11.2023)
- Vertex Paint and Vertex blend mask import (request)
- Japanese localization (partial)
- “IGToolsPP plugin” link on the bottom of UI opens the plugin folder in Content Browser
v1.4
- Anim works correctly when very far from origin
- Pivot probability generation param added
- Wind actor to control the wind (located in IGToolsPP/Blueprint)
v1.3
- Initial grass support: materials and generation UI settings
- Docs/video updated: how to export and use
v1.2.2
- Supports SubD surface/quad generator type
v1.2.1
- Bug fix
v1.2
- Added support for multiple trunks
v1.1
- Added multi-parts trees support (request). Instead of generating one mesh for the whole tree it’s now possible to generate multiple meshes, for example one for the trunk, another for the leaves etc. All parts share the same animation layer and textures. They also have the same pivot, so it’s easy to reassemble the tree from the parts. Useful if you want to specify different settings for different parts, for example “preserve area” only on leaves.
- Improved UI for UDIM material, material names are used instead of material IDs.
- Few minor bugfixes
- Docs updated