Texture Channel Packer
Table of contents
Video tutorial | Unreal Marketplace
Introduction
Texture channel packing is a technique used to store multiple images in a single texture. This is done by assigning each image to a different channel of the texture. For example you can save the base color in R,G,B channels and roughness in Alpha, or store the normal map in R,G, roughness in B and specular in Alpha channel. Texture channel packing is commonly used in Unreal. This plugin allows to pack channels directly in Unreal, without using other software.
Using the plugin
To launch the Packer UI go to “Tools” menu and click on Texture Channel Packer. If you don’t see the menu entry check that the plugin is enabled in “Windows>Plugins”
The Packer UI looks like this
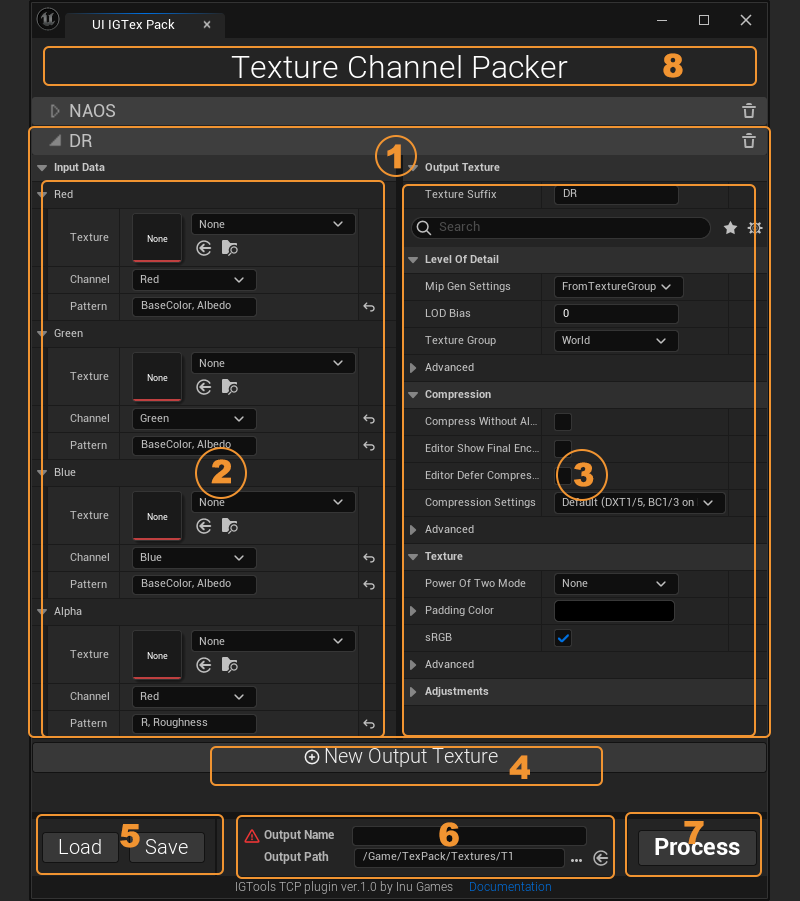
- Packed texture definition. This defines the packing of one texture. It’s possible to have many definitions in one preset, for example here we have defined 2 output textures Diffuse+Roughness (DR) and Normal+AO+Spec (NAOS)
- Input Textures and Channels. This part defines the source for each channel of the output texture. You have to specify the source texture and it’s channel, the pixels (bytes or floats) of this channel will be copied to the output. Not all output formats requires 4 inputs, for example if you specify “compress without alpha” you don’t need to provide the alpha input. All input texture should have the same width and height. The “Pattern” is explained in #8 below.
- Output Texture Settings Here you specify how the output texture should be generated. Texture suffix, if specified, will be appended to the texture name (as T_
_ ). Texture parameters
are the usual parameters you have in an Unreal texture, like Level of details, Compression and so on. - New Output Texture Click to add another output. To remove a texture definition click on the little trash can icon on top right of the texture definition.
- PresetsSave and load texture definitions.
- Output Name and FolderWhere the generated textures should go and how they should be called. The name of the texture will be T_
_ . Little arrow next to the Output Path allows to copy the current path of the Content Browser. - Process button Click it to Pack!
- Multi drop areaYou can drag and drop multiple textures from the content browser here. To find in which input slot the texture should go the “pattern” will be used. The pattern will match the texture suffix – the last part of the name separated by an underscore. The pattern is a comma separated list of allowed suffixes. For example something like “C,Color,BaseColor,Albedo”. This pattern will match a texture called T_Leaf_Color or T_Leaf_Albedo.
sRGB If the output texture is marked as “sRGB” then the input for R,G and B will also be read as sRGB.
HDRWhen copying the pixels, if the output texture is HDR (>8bit) we use floats, otherwise bytes are used
.